
Introduction
Welcome to the DeepDetect platform!
The DD platform simplifies best practices for Deep Learning / Machine Learning. As applied researchers and engineneers, we use it at Jolibrain. It it’s good for us, we hope it’s good for you.
Best Practices
We see the platform as an help for using best practices when building Deep Learning models. In more details this means:
A selection of fully tested neural network architectures that work extremely well in a large number of cases
Data pipelines for training with data augmentation that are well tested, bug-free and yield excellent results in a large number of applications
REST API and server to use deep models in production, with error handling, UI building and testing made easy.
Our goal is to transit the best results from academia to the industry, avoiding bugs and time losses, while preserving openess and usability.
Quickstart
User Setup
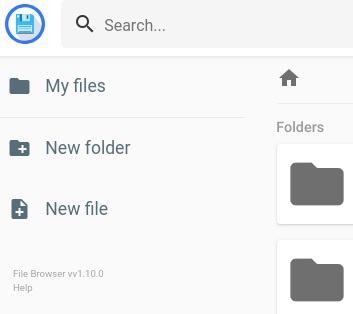
Use the New Folder button
workdirectory in JupyterLab
Inside work directory
Make a folder under your name

User setup proceeds with two steps:
Setup of your
User Data Directorythat will store all your data filesSetup of your
JupyterLab User Directorythat will store all your Python notebooks
Setup your data directory
From the main UI:
Click on Data
Go the file manager tab
Use the ‘New Folder’ button to create a folder for your username, e.g. JeanDupont
Setup your JupyterLab Python directory
From the main UI:
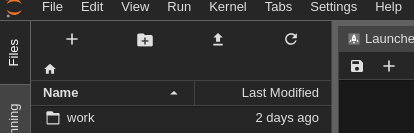
Click on Jupyter
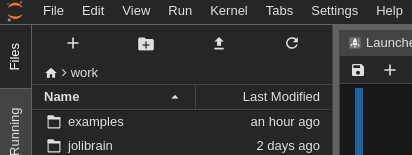
Go to the 'work' directory
Click the
New Folderbutton in the left panel of the Jupyter Lab windowRight-click on the newly created folder
Untitled Folder, chooseRenameand set your username, e.g.JeanDupont
Available models
Available models
Example predict image labels
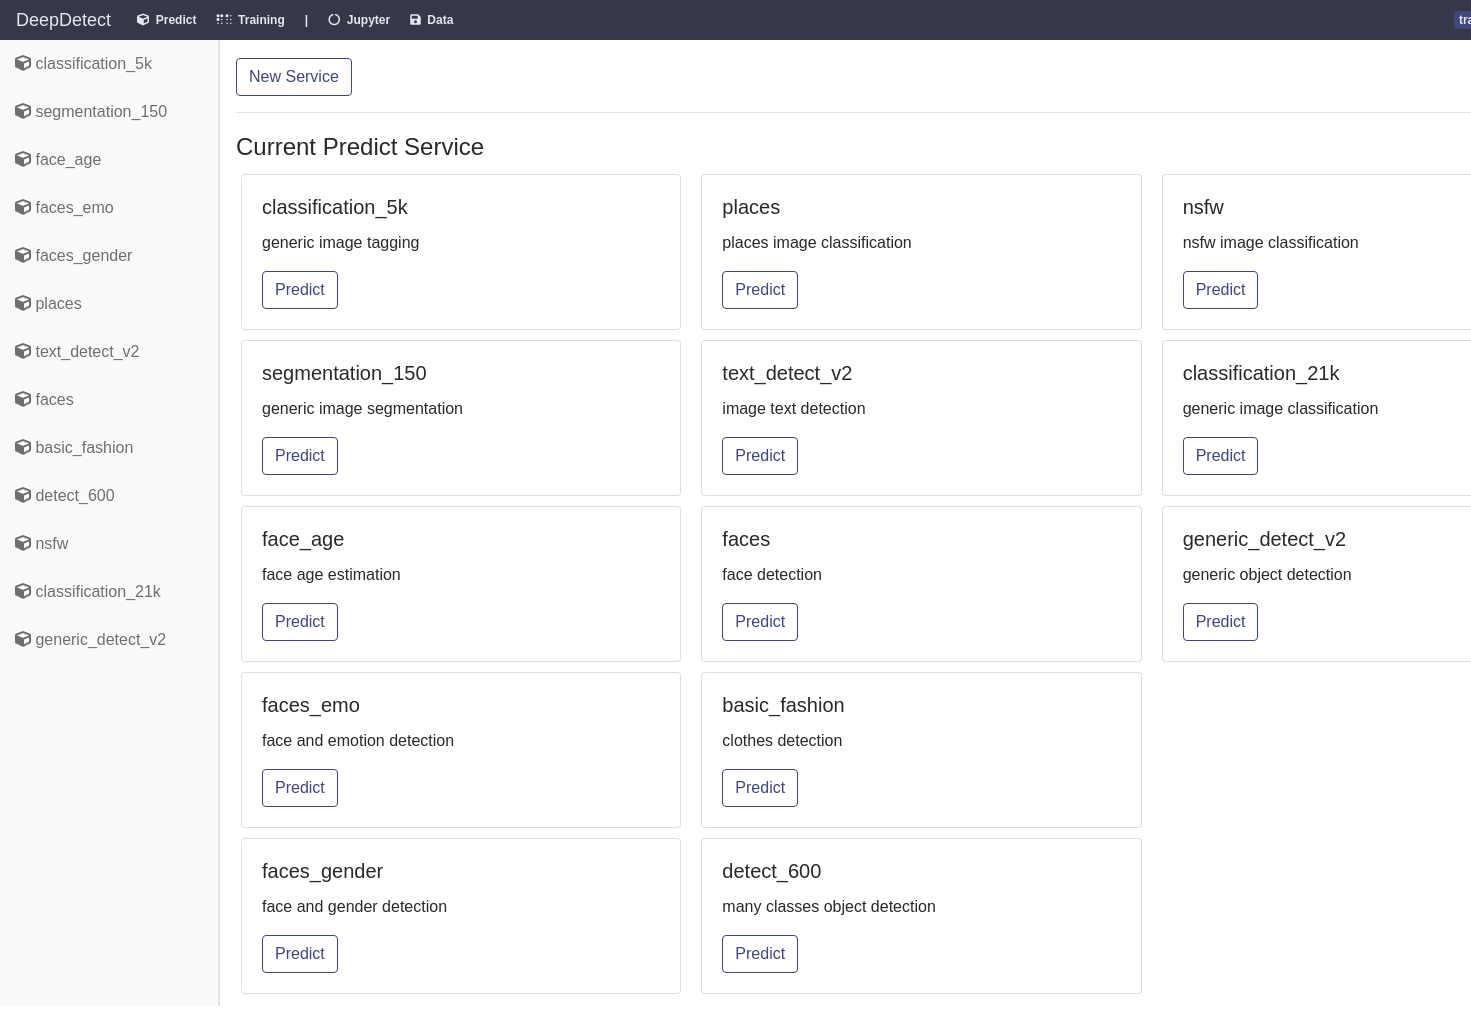
The platform sets up a range of pre-trained models that are ready to be used within applications.
To use these models:
Click on
Predictfrom the main UISelect your model from the
Current Predict Servicelist or from the left-hand tab.
For loading up your own private models see section Prediction from models
Deep Learning training examples
The platform presets a range of examples for training your own models via Jupyter calls and monitoring with the DeepDetect platform UI.
Examples cover training from CSV data, images for classification, object detection and segmentation, text classification, audio classification and generic data autoencoder.
To try one of the examples, follow the steps below:
- Copy the
work/examples/dd_examples.ipynbfile to your JupyterLab user directory, e.g.work/JeanDupont/dd_examples.ipynb
Open a new notebook from JupyterLab, rename it for instance
test1.ipynbCopy the first cell from the
dd_examples.ipynbnotebook to the first cell of your new notebook
Copy the first cell from
dd_examples.ipynb, this is the way to start any training notebook
# Copy the first cell from the `dd_examples.ipynb` notebook to the first cell of your new notebook
import sys
sys.path.append('/opt/platform/code/ddmodels/train/widgets/')
from dd_widgets import Classification, CSV, Text, Segmentation, Detection
Find the example that is of interest to your task, and copy its cell to your
test1.ipynbnotebookIn the example cells you have copied, change the
model_repovariable so that the model and files are stored within your user data directory
# Modify the model_repo
model_repo="/opt/platform/models/training/JeanDupont/covert",- Click on the ‘Run training`.
Go to the platform UI, click on the
Trainingtab where your job should appearClick on the
Monitorbutton from your training job to look at live metrics
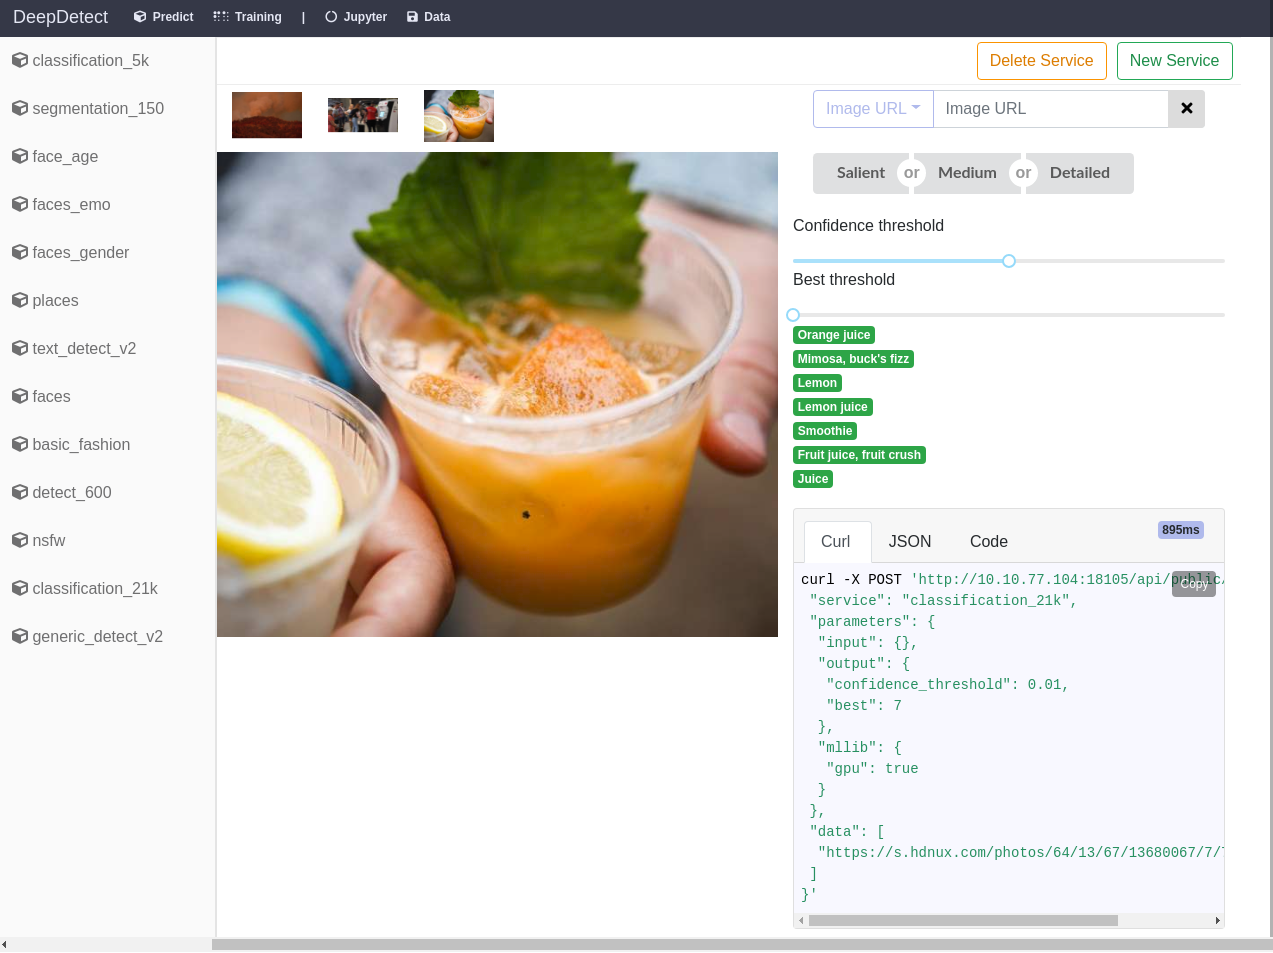
Prediction from Models
DD platform allows to use models for prediction, i.e. pass data get output such as image labels or text classification either:
Via User Interface
Via API with Python, Javascript, Shell, or any other client
Prediction from UI
Model setup for prediction (when not automated)
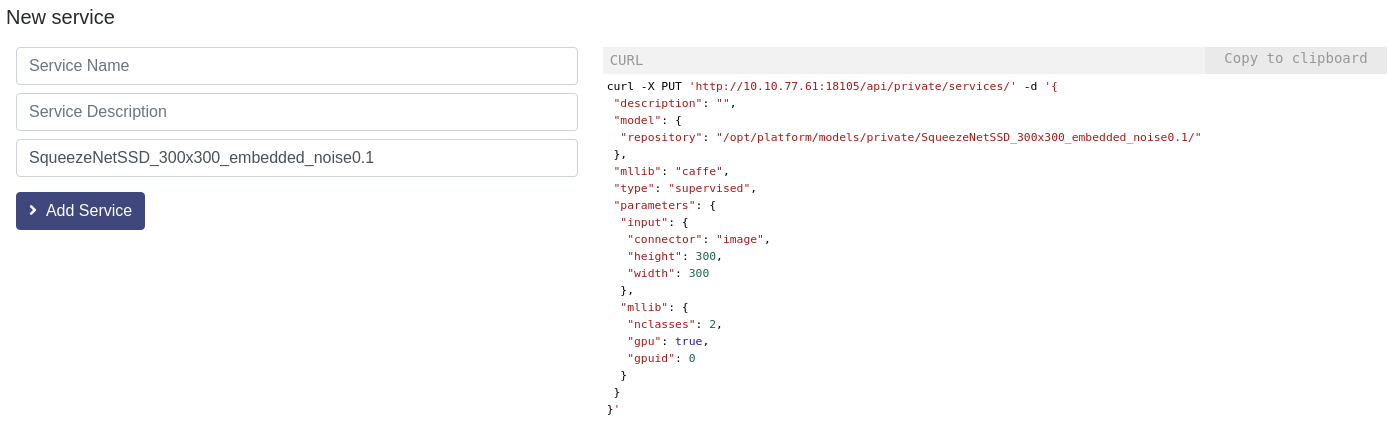
Follow the steps below:
Click on Predict to reach the model section
Locate your model and click ‘Add Service’
Two possibilities from here:
The model loads automatically and you are ready to use it through the UI
The model needs to be setup and you need to fill the parameters up, see the screenshot on the right
One a model is loaded up, you can either pass data as URL or using data you have uploaded, with the ‘Path’ option
Prediction from API
Python, Javascript and Shell code available in the UI
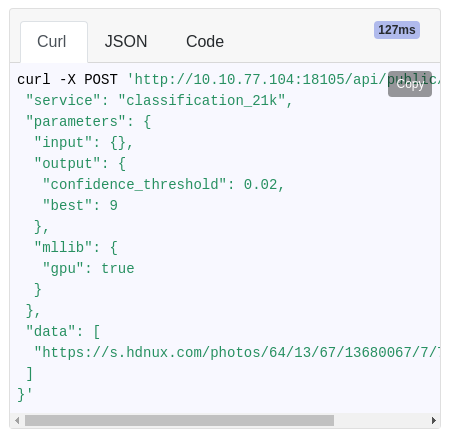
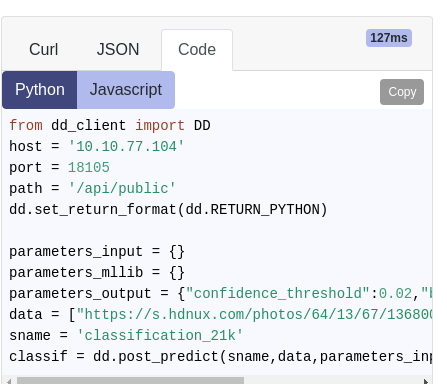
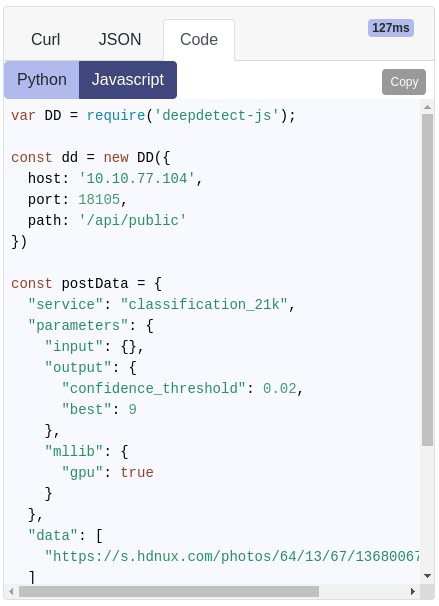
The Python, Javascript and Shell code are made available for every model call directly from the UI. This makes it easy to Copy & Paste the code to your application.
The JSON tab yields the full model output in JSON format, exactly as would be received by your application.
Available clients:
Python client, also available from the main
worksDD platform Jupyter directory.- Put the
dd_client.pyfile into your project directory
- Put the
Training from CSV data
The DD platform can train from CSV (and SVM) format.
Data format
Any CSV file with:
Text fields
Numeric fields
Categorical fields (i.e. a finite set of values, string or numbers, e.g. cities, postal codes, etc…)
You can specify both a training and a testing CSV or letting the DD platform shuffle and splitting the test set with the tsplit parameter.
The DD platform comes with a custom Jupyter UI that allows you to review your data:
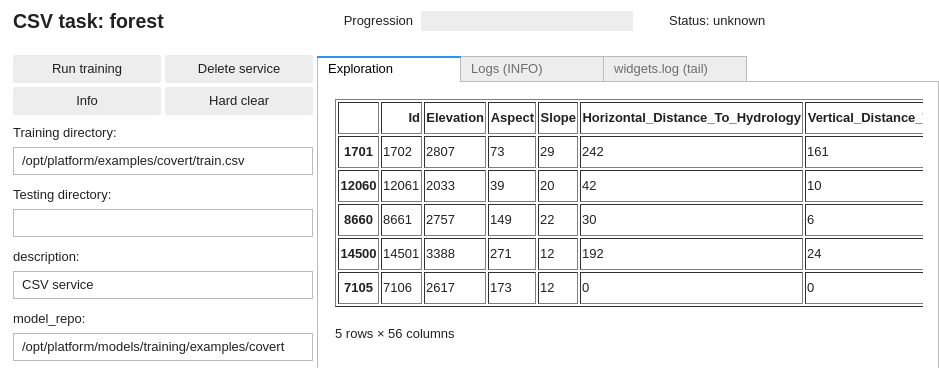
See https://deepdetect.com/tutorials/csv-training/ for some more details.
Training from CSV
DD automatically parses and manages the CSV file and data, including the handling of categorical variables and the normalization of input data.
Using the DD platform, from a JupyterLab notebook, start from the code on the right.
csv_train_job = CSV(
  'forest',
  host='deepdetect_training',
  port=8080,
  training_repo="/opt/platform/examples/covert/train.csv",
  model_repo="/opt/platform/models/training/JeanDupont/covert",
  csv_label='Cover_Type',
  csv_id='Id',
  csv_separator=',',
  tsplit=0.2,
  template='mlp',
  layers='[150,150,150]',
  activation="prelu",
  nclasses=7,
  scale= True,
  iterations=10000,
  base_lr=0.001,
  solver_type="AMSGRAD"
)
csv_train_job
This prepares a training job for a 3 layers neural network (MLP) with 150 neurons in every layer.
forestis the example job name
training_repospecifies the location of the data
csv_idspecifies, when it exists, which of the CSV columns is the identifier of the samplescsv_labelspecifies which column holds the label of the samplestsplitspecifies the part of the training set used for testing (0.2 for 20%)templatesspecifies an MLP, i.e a simple neural networklayersspecifies 3 layers of 150 hidden neurons eachpreluspecifies PReLU activationsnclassesspecifies the number of classes of the problemsolver_typespecifies the optimizer, see https://deepdetect.com/api/#launch-a-training-job andsolver_typefor the many optionsbase_lrspecifies the learning rate. For finetuning object detection models, 1e-4 works well.gpuidspecifies which GPU to use, starting with number 0
Training from Text
The DD platform can train from text as:
- documents or sentences
- word-based or character-based
And the following models:
- Neural network or Decision trees from word-based (BoW) features (better suited to documents and small datasets)
- Convolution neural nets from character-based features (better suited to sentences and large datasets)
Data format
The platform has the following format requirements for training from textual data:
- All data must be in plain text format (aka .txt files)
- UTF-8 characters are supported
For document classifications, data should be organized as:
- One directory for each class
- Every directory contains one plain text file per document
E.g. two directories, business and sport, with the relevant text files in each directory.
Document classification with one directory per class and one file per document:
mydata/training
mydata/training/business/
mydata/training/business/bus11.txt
mydata/training/business/bus23.txt
...
mydata/training/sport/
mydata/training/sport/sport34.txt
mydata/training/sport/sport98.txt
...

mydata/test/
mydata/test/business/
mydata/test/business/bus234.txt
...
mydata/test/sport
mydata/test/sport/sport321.txt
...
Sentence / short text classification with one directory per class and one line per document:
mydata/training
mydata/training/business/
mydata/training/business/all.txt
mydata/training/sport/
mydata/training/sport/all.txt

mydata/test/
mydata/test/business/
mydata/test/business/all.txt
mydata/test/sport
mydata/test/sport/all.txt
When textual data is made of a very high number of sentences or lines, e.g. tweets, the data are better organized as follows:
- One directory for each class
- Every directory contains a single file in which every line is a text sample for training.
This allows for millions of short texts to be stored and processed more efficiently.
Choose the document or sentence organisation as best for your task.
You can review your data from the notebook when preparing for training (see snippets) in sections below.
DD platform comes with a Jupyter UI to review your data:
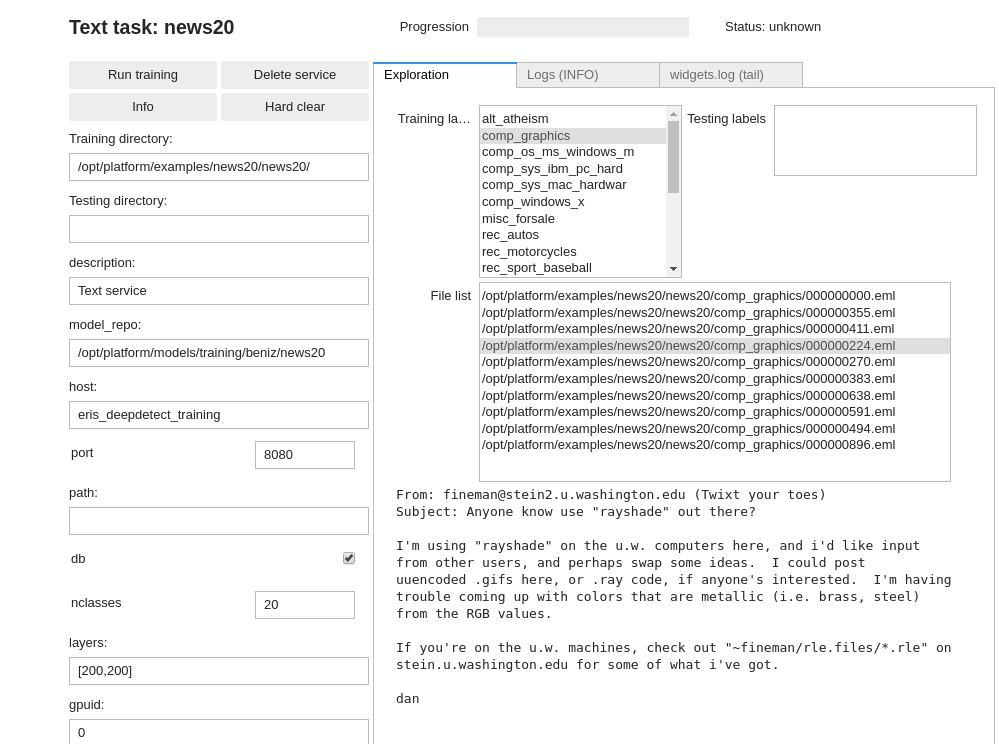
Neural network for text (BoW)
DD automatically parses and manages the BoW features as well as neural network creation.
Using the DD platform, from a JupyterLab notebook, start from the code on the right.
Neural network Bag-of-Word text classification notebook snippet:
# Neural network for text (BoW)
txt_mlp_train_job = Text(
    'news20',
    host='deepdetect_training',
    port=8080,
    training_repo='/opt/platform/examples/news20/news20/',
    model_repo='/opt/platform/models/training/JeanDupont/news20/',
    nclasses=20,
    shuffle=True,
    min_count=10,
    min_word_length=5,
    count=False,
    template='mlp',
    layers='[200,200]',
    activation='relu',
    tsplit=0.2,
    base_lr=0.001,
    solver_type='AMSGRAD',
    iterations=10000,
    test_interval=500,
    batch_size=128
)
txt_mlp_train_job
This prepares a training job named news20 for a two-layers MLP with 200 hidden neurons in every layer, using ReLU activations. The dataset is automatically shuffled and splitted with 80% used for training, and 20% used for testing. Solver is AMSGRAD, learning rate is 1e-3 over 10000 iterations of batches of 128 samples.
Text is automatically pre-processed so that min word size is 5 and words with counts below 10 are ignored, and features are whether a word is present or not (count:false).
See https://deepdetect.com/tutorials/txt-training/ for a more thorough description of some options.
Convolutional networks for text (character-based)
DD automatically parses and managers the BoW features as well as neural network creation.
Using the DD platform, from a JupyterLab notebook, start from the code on the right.
Character-based Convolutional Network for text classification notebook snippet:
# Convolutional network for text (character-based)
txt_convnet_train_job = Text(
  'news20_convnet',
  training_repo = '/opt/platform/examples/news20/news20/',
  testing_repo=None,
  host='deepdetect_training',
  port=8080,
  model_repo="/opt/platform/models/training/JeanDupont/news20_convnet/",
  db=True,
  nclasses=20,
  characters=True,
  read_forward=False,
  sequence=512,
  embedding=True,
  template="vdcnn_9",
  iterations=10000,
  test_interval="1000",
  batch_size=128,
  base_lr=0.001,
  solver_type="AMSGRAD",
  tsplit=0.2,
  shuffle=True,
  target_repository='/opt/platform/models/private/news20_convnet'
)
txt_convnet_train_job
This prepares a training job named news20_convnet.
It uses a VDCNN-9 that is a 9 layers 1-D convolutional network for text. The network reads sequences of 512 characters backwards (i.e. from the end of the text / sentence back to the beginning, up to 512 characters).
The dataset is automatically shuffled and splitted with 80% used for training, and 20% used for testing. Solver is AMSGRAD, learning rate is 1e-3 over 10000 iterations of batches of 128 samples.
Text is automatically pre-processed into characters with embeddings.
Training from Images
The DD platform can train from images for a variety of tasks:
- Image classification
- Object detection
- Image segmentaiton
- OCR
Image classification
Image classification is the task to attach a single label to an image, e.g. to determine whether an image is a cat or a dog.
Data format
The platform has the following requirments for training from images for single label classification:
- All data must be in image format, most encoding supported (e.g. png, jpg, …)
Use on directory for each class
Every directory contains an image per training or testing samples for that class
Data format for image classification:
mydata/train/
mydata/train/dogs/
mydata/train/dogs/dog.1223.jpg
mydata/train/dogs/dog.2124.jpg
mydata/train/cats/cat.314.jpg
mydata/train/cats/cat.3124.jpg

mydata/test/dogs/
mydata/test/dogs/dog.3333.jpg
mydata/test/cats/
mydata/test/cats/cat.1123.jpg
DD platform comes with a custom Jupyter UI that allows testing your dataset prior to starting the training:
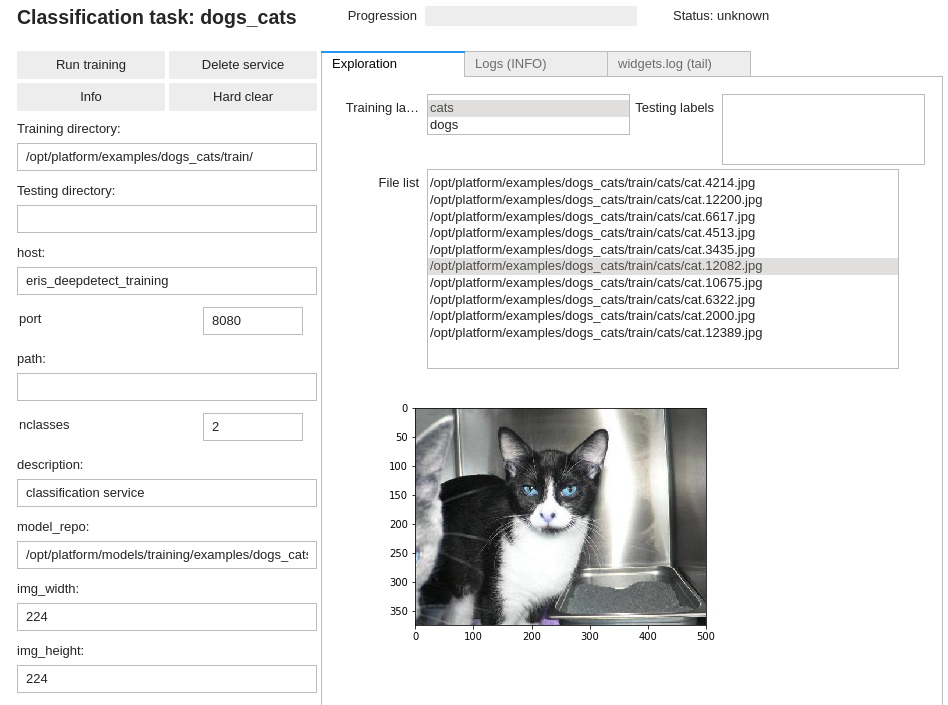
Training an image classifier
Using the DD platform, from a JupyterLab notebook, start from the code on the right.
Image classification notebook snippet:
img_classif = Classification(
  'dogs_cats',
  training_repo='/opt/platform/examples/dogs_cats/train/',
  tsplit=.2,
  host='deepdetect_training',
  port=8080,
  model_repo='/opt/platform/models/training/JeanDupont/dogs_cats',
  template='se_resnet_50',
  img_width=224,
  img_height=224,
  mirror=True,
  rotate=False,
  base_lr=0.001,
  solver_type="AMSGRAD",
  finetune=True,
  weights='/opt/platform/models/pretrained/se_resnet_50/SE-ResNet-50.caffemodel',
  iterations=2500,
  test_interval=500,
  snapshot_interval=5000,
  batch_size=16,
  iter_size=2,
  nclasses=2,
  test_batch_size=4,
  noise_prob=0.001,
  distort_prob=0.001,
  gpuid=0
)
img_classif
This prepares for training an images classifier with the following parameters:
- ‘dogs_cats` is the example job name
training_repospecifies the location of the data
templatespeficies a Squeeze-Excitation ResNet-50 that has excellent capabilitiesmirroractivates mirroring of inputs as data augmentationnoise_probanddistort_probactivate random transforms for data augmentation, see https://deepdetect.com/tutorials/data-augmentation/ for more detailsfinetuneautomatically prepares the network architecture for finetuningweightsspecifies the pre-trained model weights to start training fromsolver_typespecifies the optimizer, see https://deepdetect.com/api/#launch-a-training-job andsolver_typefor the many optionsbase_lrspecifies the learning rate.gpuidspecifies which GPU to use, starting with number 0
You should get around 99% accuracy on the example cats & dogs dataset with the configuration above.
Recommended models
The platform has many neural network architectures and pre-trained models built-in for image classification. These range from state of the art architectures like ResNets and DenseNets to low-memory Squeezenet, Shufflenet and Mobilenet.
Below is a list of recommended models for image classification from which to best choose for your task.
| Model | Template | Pre-Trained (/opt/platform/models/pretrained) | Recommendation |
|---|---|---|---|
| GoogleNet | googlenet |
googlenet/bvlc_googlenet.caffemodel | Very Fast / Good accuracy / embedded & desktops |
| SE-ResNet-50 | se_resnet_50 |
se_resnet_50/SE-ResNet-50.caffemodel | Fast / Excellent accuracy / desktops |
| SqueezeNet | squeezenet |
squeezenet/squeezenet_v1.1.caffemodel | Extremely Fast / Good accuracy / embedded |
For a full list of available templates and models, see https://github.com/jolibrain/deepdetect/blob/master/README.md#models
For a review of performances on desktops and embedded devices, see https://github.com/jolibrain/dd_performances
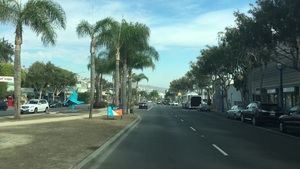
Object detection
Object detection is the task of finding objects into an image and labeling them.
The output of an object classifier is a list of objects with for every detected object:
Coordinates of the bounding box that encloses the object. A bounding box is described as two points, the
top-left cornerand thelower-right cornerof a a rectangle bounding box.Estimated label for the object, e.g. cat
Data format
Object location text file format (required for every image):
<label> <xmin> <ymin> <xmax> <ymax>
Example of object location text file for the image below
file bbox_img_3333.txt
1 3086 1296 3623 1607
1 2896 1340 3205 1539
1 2519 1326 2694 1427
1 2330 1197 2580 1392
1 1781 1306 1885 1390
1 2013 1285 2057 1325
1 2108 1252 2175 1333
1 2161 1292 2278 1348
1 252 1266 627 1454
1 620 1285 799 1376
- 1 indicates class number 1, here a car
- Coordinates are in pixel wrt the original image size
Object detection main image list format
/path/to/image.jpg /path/to/bbox_file_image.jpg
Object detection main image list example from
/opt/platform/examples/cars/train.txt:
/opt/platform/examples/cars/imgs//youtube_frames/toronto-main-street-000147.jpg /opt/platform/examples/cars/bbox//toronto-main-street-000147.txt
/opt/platform/examples/cars/imgs//youtube_frames/crazy-000022.jpg /opt/platform/examples/cars/bbox//crazy-000022.txt
/opt/platform/examples/cars/imgs//youtube_frames/mass6-000363.jpg /opt/platform/examples/cars/bbox//mass6-000363.txt
/opt/platform/examples/cars/imgs//normal_rgb_images/tme17/Right/010475-R.jpg /opt/platform/examples/cars/bbox//010475-R.txt
We suggest organizing the dataset files as follows:
your_data/imgs/
your_data/imgs/img1.jpg
your_data/imgs/img2.jpg
...
your_data/bbox/
your_data/bbox/img1.txt
your_data/bbox/img2.txt
...
your_data/train.txt
your_data/test.txt
The DD platform has the following requirements for training from images for object detection:
- All data must be in image format, most encoding supported (e.g. png, jpg, …)
- For every image there’s a text file describing the class and location of objects in the image. See format on the right. If no bounding boxes for an image, create an empty text file.
A main text file lists all image paths and their object location file counterpart, using space as a separator. See on the right for data format and example.
You need to prepare both a
train.txtandtest.txtfile for training and testing purposes.
DD platform comes with a custom Jupyter UI that allows testing your object detection dataset prior to training:

Training an object detector
Using the DD platform, from a JupyterLab notebook, start from the code on the right.
Object detection notebook snippet:
img_obj_detect = Detection(
  "cars",
  training_repo= "/opt/platform/examples/cars/train.txt",
  testing_repo= "/opt/platform/examples/cars/test.txt",
  host='deepdetect_training',
  port=8080,
  model_repo='/opt/platform/models/training/examples/cars/',
  img_width=300,
  img_height=300,
  db_width=512,
  db_height=512,
  snapshot_interval=500,
  test_interval=500,
  iterations=25000,
  template="ssd_300",
  mirror=True,
  rotate=False,
  finetune=True,
  weights="/opt/platform/models/pretrained/ssd_300/VGG_ILSVRC_16_layers_fc_reduced.caffemodel",
  batch_size=16,
  iter_size=2,
  test_batch_size=4,
  nclasses=2,
  base_lr=0.0001,
  solver_type="RMSPROP",
  gpuid=2
)
img_obj_detect
This prepares for training an object detector with the following parameters:
carsis the example job name
training_repospecifies the location of the data
templatespecifies an SSD-300 architecture that is fast and has good accuracy. See the recommended models section.img_widthandimg_heightspecify the input size of the image, see the recommended models section to adapt to other architectures available.db_widthanddb_heightspecify the image input size from which the data augmentation is applied during training. Typically zooming and distorsions yield more accurate and robust models. A good rule of thumb is to use roughly twice the size of the architecture input size (e.g. 300x300 -> 512x512 and 512x512 -> 1024x1024).
mirroractivates mirroring of inputs as data augmentation for both the input image and the bounding boxrotateactivates rotation of inputs as data augmentation for both the input image and the bounding box (e.g. useful for satellite images, …)finetuneautomatically prepares the network architecture for finetuningweightsspecifies the pre-trained model weights to start training fromsolver_typespecifies the optimizer, see https://deepdetect.com/api/#launch-a-training-job andsolver_typefor the many optionsbase_lrspecifies the learning rate. For finetuning object detection models, 1e-4 works well.gpuidspecifies which GPU to use, starting with number 0
Recommended models
The platform has many neural network architectures and pre-trained models built-in for object detection. These range from state of the art architectures like SSD, SSD with resnet tips, RefineDet for state of the art, to low-memory Squeezenet-SSD and Mobilenet-SSD.
Below is a list of recommended models for image classification from which to best choose for your task.
| Model | Template | Image size | Pre-Trained (/opt/platform/models/pretrained) | Recommendation |
|---|---|---|---|---|
| SSD-300 | 300x300 | ssd_300 |
ssd_300/VGG_rotate_generic_detect_v2_SSD_rotate_300x300_iter_115000.caffemodel | Very Fast / Good accuracy / embedded & desktops |
| SSD-300-res-128 | 300x300 | ssd_300_res_128 |
ssd_300_res_128/VGG_fix_pretrain_ilsvrc_res_pred_128_generic_detect_v2_SSD_fix_pretrain_ilsvrc_res_pred_128_300x300_iter_184784.caffemodel | Fast / Very good accuracy / desktops |
| SSD-512 | 512x512 | ssd_512 |
ssd_512/VGG_fix_512_generic_detect_v2_SSD_fix_512_512x512_iter_180000.caffemodel | Fast / Very good accuracy / desktops |
| RefineDet-512 | 512x512 | refinedet_512 |
refinedet_512/VOC0712_refinedet_vgg16_512x512_iter_120000.caffemodel | Fast / Excellent accuracy / desktops |
| SqueezeNet-SSD | 300x300 | squeezenet_ssd |
squeezenet_ssd/SqueezeNet_generic_detect_v2_SqueezeNetSSD_300x300_iter_200000.caffemodel | Extremely Fast / Good accuracy / embedded |
For a full list of available templates and models, see https://github.com/jolibrain/deepdetect/blob/master/README.md#models
Image segmentation
Image segmentation is the task of predicting a class for every pixel in an image. This allows to very finely delimitates objects and shapes of many classes from within images, at once.
Data format
Image segmentation image & mask example
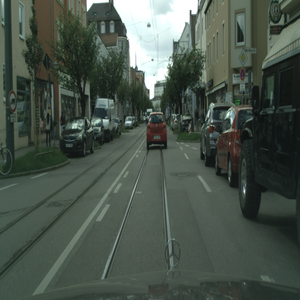

Image segmentation main image list format from
/opt/platform/examples/cityscapes/train.txt:
/opt/platform/examples/cityscapes/train/imgs//konstanz_000000_001391_leftImg8bit.png /opt/platform/examples/cityscapes/train/annot/konstanz_000000_001391_gtCoarse_labelTrainIds.png
/opt/platform/examples/cityscapes/train/imgs//dortmund_000000_000053_leftImg8bit.png /opt/platform/examples/cityscapes/train/annot/dortmund_000000_000053_gtCoarse_labelTrainIds.png
/opt/platform/examples/cityscapes/train/imgs//heidelberg_000000_001065_leftImg8bit.png /opt/platform/examples/cityscapes/train/annot/heidelberg_000000_001065_gtCoarse_labelTrainIds.png
/opt/platform/examples/cityscapes/train/imgs//berlin_000170_000019_leftImg8bit.png /opt/platform/examples/cityscapes/train/annot/berlin_000170_000019_gtFine_labelTrainIds.png
We suggest to organize the files as follows:
your_data/train
your_data/train/train.txt
your_data/train/annot
your_data/train/annot/annot_img1.png
your_data/train/annot/annot_img2.png
...
your_data/train/imgs
your_data/train/imgs/img1.jpg
your_data/train/imgs/img2.jpg
...

your_data/test
your_data/test/test.txt
your_data/test/annot
your_data/test/annot/annot_img100.png
your_data/test/annot/annot_img200.png
...
your_data/test/imgs
your_data/test/imgs/img100.jpg
your_data/test/imgs/img200.jpg
...
The DD platform has the following requirements for training from images for segmentation:
- All data must be in image format, most encoding supported (e.g. png, jpg, …)
- For every image, there’s a mask describing the class of every pixel of the image, itself in the form of an 8-bit 1-channel image. In other words, the mask must be a black and white image (single channel) with values from 0 to 255 maximum. Each value represents a class, so for a two classes model (background and an object type), pixels can only be 0 or 1. For a two classes segmentation problem, pixels can only be 0, 1 or 2, etc… See examples on the right
A main text file lists all image paths and their image mask counterpart, using space as a separator. See on the right for data format and example.
You need to prepare both a
train.txtandtest.txtfile for training and testing purposes.
DD platform comes with a custom Jupyter UI that allows testing your image segmentation dataset prior to training:

Training an image segmenter
Using the DD platform, from a JupyterLab notebook, start from the code on the right.
Image segmentation notebook snippet:
city_seg = Segmentation(
  'city_psp',
  training_repo='/opt/platform/examples/cityscapes/train.txt',
  testing_repo='/opt/platform/examples/cityscapes/test_shuf50.txt',
  host='deepdetect_training',
  port=8080,
  img_height=480,
  img_width=480,
  model_repo='/opt/platform/models/training/beniz/cityscapes/',
  nclasses=8,
  template='pspnet_vgg16',
  iterations=75000,
  test_interval=1000,
  snapshot_interval=1000,
  batch_size=6,
  test_batch_size=1,
  noise_prob=0.001,
  distort_prob=0.001,
  gpuid=0,
  base_lr=0.001,
  weights='/opt/platform/models/pretrained/pspnet_vgg16/vgg16_init_deeplab.caffemodel',
  solver_type="AMSGRAD",
  finetune=True,
  rotate=False,
  mirror=True,
  resume=False,
  loss='dice_weighted'
  )#.run()
city_seg
This prepares for training an image segmentere with the following parameters:
city_pspis the example job name
training_repospecifies the location of the data
templatespecifies a PSPNet with VGG-16 basis that has state of the art performances.lossspecifies the loss to be used to train the model. For two-classes problems,diceworks best. For multi-class problems, weighersoftmaxordice_weightedare recommended. When usingsoftmaxloss, see how to useclass_weightsfrom the main API documentation at https://deepdetect.com/api/#launch-a-training-job at it improves training of segmentation tasks that in general have very unbalanced classes.img_widthandimg_heightspecify the input size of the image, see the recommended models section to adapt to other architectures available.noise_probanddistort_probcontrol the random occurence of tens of data augmentation schemes.0.001is usually a good value for both when data is scarce.mirroractivates mirroring of inputs as data augmentation for both the input image and the maskrotateactivates rotation of inputs as data augmentation for both the input image and the mask (e.g. useful for satellite images, …)finetuneautomatically prepares the network architecture for finetuningweightsspecifies the pre-trained model weights to start training fromsolver_typespecifies the optimizer, see https://deepdetect.com/api/#launch-a-training-job andsolver_typefor the many optionsbase_lrspecifies the learning rate. For finetuning mask detection models, 1e-3 works well.gpuidspecifies which GPU to use, starting with number 0
Recommended models for image segmentation
The platform has many neural network architectures and pre-trained models built-in for image segmentation. These range from state of the art architectures like PSPNet and Deeplab for state of the art, U-Net for flexibility and SE-Net for low-memory and embedded tasks.
Below is a list of recommended models for image classification from which to best choose for your task.
| Model | Template | Image size | Pre-Trained (/opt/platform/models/pretrained) | Recommendation |
|---|---|---|---|---|
| PSPNet | 480x480 | pspnet_vgg16 |
pspnet_vgg16/vgg16_init_deeplab.caffemodel | Fast / Excellent accuracy /desktops |
| Deeplab | 480x480 | deeplab_vgg16 |
deeplab_vgg16/vgg16_init_deeplab.caffemodel | Fast / Excellent accuracy / desktops |
| U-Net | 480x480 | unet |
none, from scratch | Flexible / Very good accuracy / embedded & desktops |
| SE-Net | 224x224 | se_net |
none, from scratch | Extremely fast / Average accuracy / embedded |
OCR
Data format
The DD platform has the following requirements for training from images for OCR:
- All data must be in image format, most encoding supported (e.g. png, jpg, …)
A main text file list all images path and their OCR string counterpart, using space as a separator. See on the right for data format and examples
You need to prepare both a
train.txtandtest.txtfile for training and testing purposes.
DD platform comes with a custom Jupyter UI that allows testing your OCR dataset prior to training:
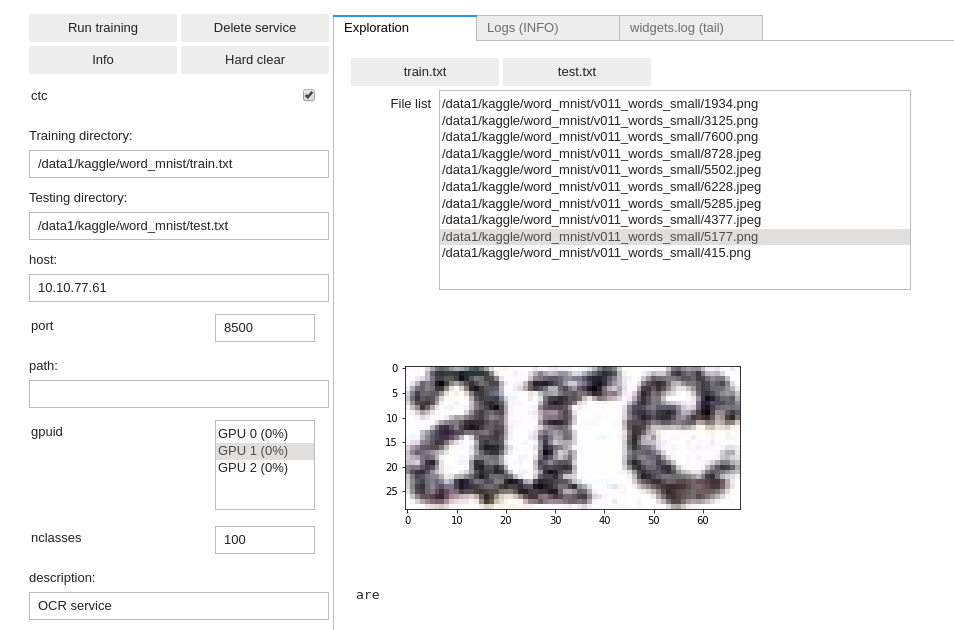
Training an OCR reader
OCR image & data example
OCR example train.txt file:
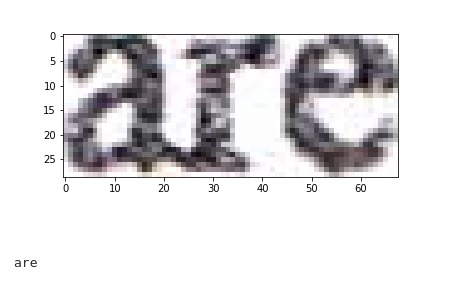
/opt/platform/examples/word_mnist/v011_words_small/9281.png possible
/opt/platform/examples/word_mnist/v011_words_small/3426.png burgers,
/opt/platform/examples/word_mnist/v011_words_small/4901.png bank.
/opt/platform/examples/word_mnist/v011_words_small/8.jpeg what
/opt/platform/examples/word_mnist/v011_words_small/1547.jpeg OF
/opt/platform/examples/word_mnist/v011_words_small/2238.jpeg Littlefield
Using the DD platform, from a JupyterLab notebook, start from the code on the right.
OCR notebook snippet:
ocr = OCR(
    'word_mnist',
    training_repo='/opt/platform/examples/word_mnist/train.txt',
    testing_repo='/opt/platform/examples/word_mnist/test.txt',
    host='deepdetect_training',
    port=8080,
    img_height=80,
    img_width=128,
    model_repo='/opt/platform/models/training/jolibrain/words_mnist',
    nclasses=100,
    template='crnn',
    iterations=10000,
    test_interval=1000,
    snapshot_interval=1000,
    batch_size=128,
    test_batch_size=32,
    noise_prob=0.001,
    distort_prob=0.001,
    gpuid=1,
    base_lr=0.0001,
    solver_type='ADAM',
    mirror=False,
    rotate=False,
    resume=False
)
ocr
This prepares a CNN + dual-LSTM layers deep network with the following parameters:
word_mnistis the example job name
training_repospecifies the location of the data
templatespecifies a CRNN that here is a few CNN layers with two LSTM on top and CTC loss output for sequence-to-sequence end-to-end architectureimg_widthandimg_heightspecify the input size of the image, see the recommended models section to adapt to other architectures available. Note that we are using a rectangular input shape best suited to horizontal words.noise_probanddistort_probcontrol the random occurence of tens of data augmentation schemes.0.001is usually a good value for both when data is scarce.solver_typespecifies the optimizer, see https://deepdetect.com/api/#launch-a-training-job andsolver_typefor the many optionsbase_lrspecifies the learning rate. For finetuning mask detection models, 1e-3 works well.gpuidspecifies which GPU to use, starting with number 0
Training Unsupervised Models
T-SNE
T-SNE is mostly useful for data visualization.
Data format
T-SNE use CSV data format, see the relevant CSV data section above.
Training for a T-SNE visualization
Using DD platform, from a JupyterLab notebook, start from the code on the right.
T-SNE notebook snippet:
tsne_mnist = TSNE_CSV(
    'tsne_mnist',
    training_repo = 'https://deepdetect.com/dd/datasets/mnist_csv/mnist_test.csv',
    host='deepdetect_training',
    port=8080,
    model_repo='/opt/platform/models/training/examples/test_tsne/',
    iterations = 5000,
    perplexity = 30
)
tsne_mnist
Building a T-SNE plot after training has completed:
tsne_mnist.plot()Screening the T-SNE plot with per-class colours:
import pandas as pd
df_orig = pd.read_csv("/path/to/mnist_train.csv")
tsne_mnist.plot(s=10, marker='^', c=df_orig.label, cmap='jet')
This runs a T-SNE compression job with the following parameters:
tsne_mnistis the example job name
training_repospecifies the location of the dataiterationsspecifies the maximum number of iterationsperplexityis related to the number of nearest neighbors used to learn the underlying manifold.
Once training has finished, the following steps on the right can be used to generate the plot below:

Autoencoders
Training jobs & Monitoring
This section goes step by step into generic instructions for launching and monitoring training jobs.
Launching a training job
First you have to setup your training job and verified your data are correctly setup using the DD platform custom Jupyter tooling.
To launch a training job, use the Run training button:
Training job setup
Every training job appears into the UI as a badge on the ‘Training’ page
![]()
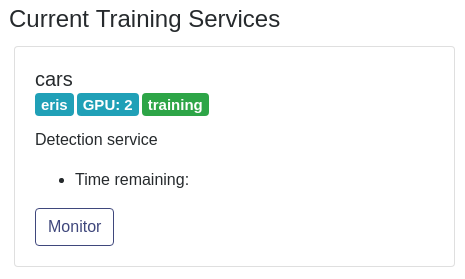
For some training jobs, an internal setup, e.g. pre-processing the full dataset, can take a few minutes. In that case, the metrics may not appear immediately, and the badge may look like this for a moment:
Training job monitoring
Training jobs can last from minutes to several days. For this reason the DD platform yields a few tools for monitoring the running jobs:
- ‘Training’ section of the UI reports on all the currently training jobs:
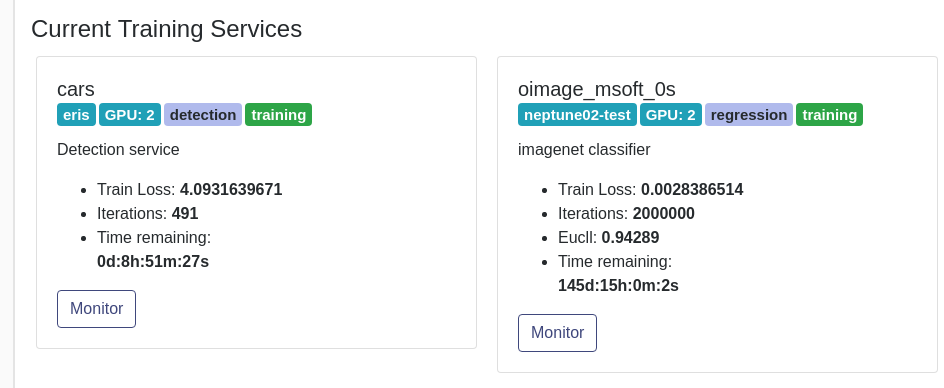
- The ‘Monitor’ button on the training badge yields metrics and details on the run:

- The DD platform custom Jupyter notebook screens the progression, status and remaining time of the training job:

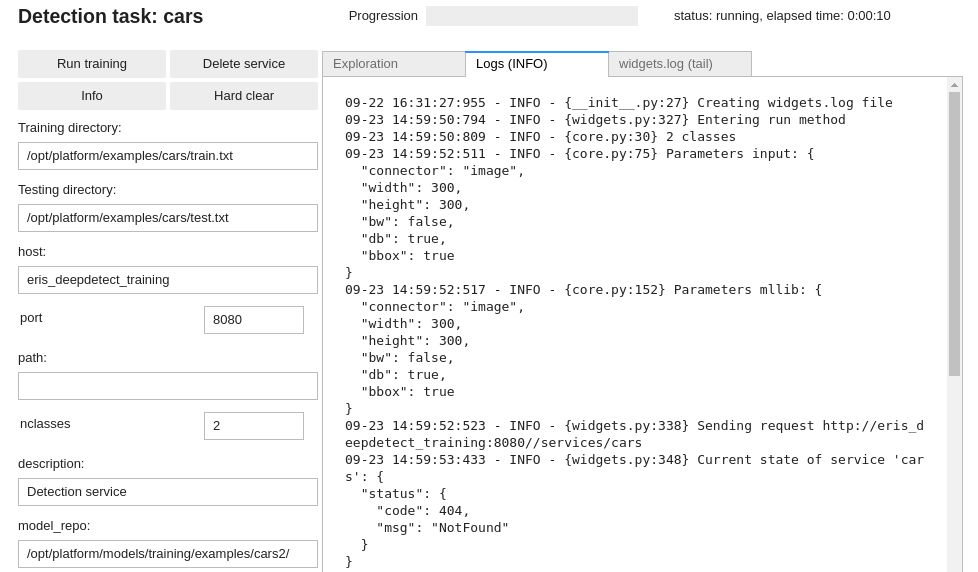
- The DD platform custom Jupyter notebook allows fine-grained monitoring of the job calls, via the
Logstab:

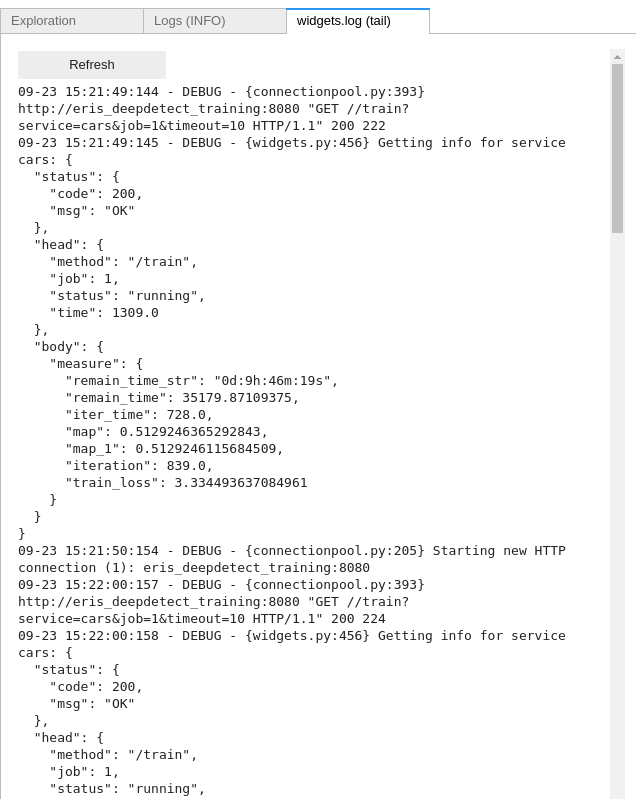
- For even fine-grained information, the
Widget logstab can be refreshed when needed. It captures all calls between Jupyter and the Deep Learning server:
Stopping a training job
To stopping a training job, use the ‘Delete Service’ button:
Training job failures
If you believe your training job has failed, see the Debugging Models section.
Debugging Models
Checking error status
Your training job has failed, follow the steps below in order to start again properly:
- Let’s make sure training has failed by checking on the Jupyter job status, an error would look like this:

Debugging
Many errors come from a wrongly initialized model directory, and this especially happens after stopping a training job, and restarting it. To fix this issue, try the following:
From your DD platform Jupyter training job notebook, click on
Hard clearClick on
Delete service
Error says ‘CudaSuccess error`: this means the GPU used for training does not have enough memory, make sure to:
Check the occupancy of the GPU from the DD platform UI, maybe someone else is using it.
Lower your
batch_sizeandtest_batch_size. If yourbatch_sizewas 32, setbatch_sizeto 16, and setiter_sizeto 2: this is equivalent to a 32 batch size, by unrolling it into two passes.
DD platform Jupyter status says
error, follow the following steps to uncover the error code and message:Go to the
Logstab and look for error messagesGo to the
Widgets.logtab, clickRefreshand look for error messages