Training an Autoencoder
Tabular Data Autoencoder
Autoencoders are neural networks that compress then reconstruct their inputs. Useful for clustering and non-linear dimensionality reduction.
Data format
Autoencoders use CSV data format, see the relevant CSV data section above.
Training an Autoencoder
Using DD platform, from a JupyterLab notebook, start from the code on the right.
CSV autoencoder notebook snippet:
autoenc_train_job = CSV(
    'auto_mnist',
    host='deepdetect_training',
    port=8080,
    training_repo="/opt/platform/examples/mnist_csv/mnist_train.csv",
    testing_repo="/opt/platform/examples/mnist_csv/mnist_test.csv",
    model_repo="/opt/platform/models/training/examples/auto_mnist",
    csv_label="label",
    db=True,
    template='mlp',
    layers='[500,250,30,250,500]',
    activation="sigmoid",
    dropout=0.0,
    autoencoder=True,
    scale= True,
    iterations=65000,
    test_interval=5000,
    base_lr=0.01,
    batch_size=128,
    solver_type="AMSGRAD"
)
autoenc_train_job
This builds a multi-layer neural network with an hourglass architecture. The inner encoding is here of size 30. The model is trained with the following parameters:
auto_mnistis the example job name
training_repospecifies the location of the train datatesting_repospecifies the location of the test dataautoencodersets to true specifies that the model is trained as autoencoder, i.e. its labels are its inputs.sigmoidspecifies the type of activations
Python script to screen the results
from dd_client import DD
import numpy as np
import matplotlib.pyplot as plt
import csv
import sys

host = 'localhost'
sname = 'mnist'

dd = DD(host)
dd.set_return_format(dd.RETURN_PYTHON)

scale_min = [0]*784
scale_max = [255]*784

parameters_input = {'separator':',','scale':True,'min_vals':scale_min,'max_vals':scale_max,'ignore':['label']}
parameters_mllib = {'extract_layer':'sig'}
parameters_output = {}
test_csv = '/path/to/mnist_test_10.csv'

n = 10
test_imgs = []
c = -1
with open(test_csv,'r') as csvfile:
    csvreader = csv.reader(csvfile,delimiter=',')
    for row in csvreader:
	if c == -1:
	     c = 0
 	     continue
	row.pop(0)
	test_imgs.append(np.array(row).astype(int))
	c = c + 1
	if c == n:
	   break

data = [test_csv]
pred = dd.post_predict(sname,data,parameters_input,parameters_mllib,parameters_output)
decoded_imgs = []
for i in range(0,10):
    predi = pred['body']['predictions'][i]['vals']
    decoded_imgs.append(np.multiply(predi,scale_max))

plt.figure(figsize=(20,4))
for i in range(n):
    ax = plt.subplot(2, n, i + 1)
    plt.imshow(test_imgs[i].reshape(28, 28))
    plt.gray()
    ax.get_xaxis().set_visible(False)
    ax.get_yaxis().set_visible(False)

    # display reconstruction
    ax = plt.subplot(2, n, i + 1 + n)
    plt.imshow(decoded_imgs[i].reshape(28, 28))
    plt.gray()
    ax.get_xaxis().set_visible(False)
    ax.get_yaxis().set_visible(False)

plt.show()
This should yield

Image Autoencoder
Convolutional (CNN) autoencoders are neural networks that use convolutions and deconvolutions to compress then reconstruct their image inputs. They are useful for clustering, similarity search and initializing some other networks sometimes.
Data format
CNN autoencoders use the same image data format as image classifiers, see the relevant section.
Training a CNN Autoencoder
Using DD platform, from a JupyterLab notebook, start from the code on the right.
CNN Autoencoder notebook snippet:
cnn_autoenc_train_job = Classification(
    'autoenc_cnn',
    host='deepdetect_training',
    port=8080,
    training_repo="/opt/platform/examples/cnn_autoenc/impressionism/",
    testing_repo="/opt/platform/examples/cnn_autoenc/test/",
    model_repo="/opt/platform/models/training/examples/cnn_autoenc/",
    template='convnet',
    layers='["1CR32","1CR32","1CR32","DR32","1CR32","DR32","1CR32"]',
    activation="relu",
    dropout=0.0,
    autoencoder=True,
    scale=0.004,
    bw=False,
    img_width=224,
    img_height=224,
    iterations=56000,
    test_interval=2000,
    base_lr=0.0001,
    batch_size=64,
    test_batch_size=16,
    solver_type="ADAM",
    gpuid=0,
    noise_prob=0.001,
    mirror=True
)
cnn_autoenc_train_job
Screening a CNN autoencoder image reconstruction:
%matplotlib inline
from dd_client import DD
import numpy as np
np.set_printoptions(threshold=np.nan)
import matplotlib.pyplot as plt
import cv2
import sys
host = 'deepdetect_public'
port = 8080
dd = DD(host,port)
dd.set_return_format(dd.RETURN_PYTHON)
height = 224
width = 224
# service creation
parameters_input = {'connector':'image','width':width,'height':height,'bw':False}
parameters_mllib = {'autoencoder':True,'gpu':True,'gpuid':0}
parameters_output = {}
model = {'repository':'/opt/platform/models/training/examples/cnn_autoenc/'}
try:
creat = dd.put_service(sname,model,'autoenc_test','caffe',parameters_input,parameters_mllib,parameters_output,'unsupervised')
except:
pass
# image reconstruction
parameters_input = {'bw':False, 'segmentation':False}
parameters_mllib = {'extract_layer':'act_Sigmoid_conv_flatten'}
parameters_output = {}
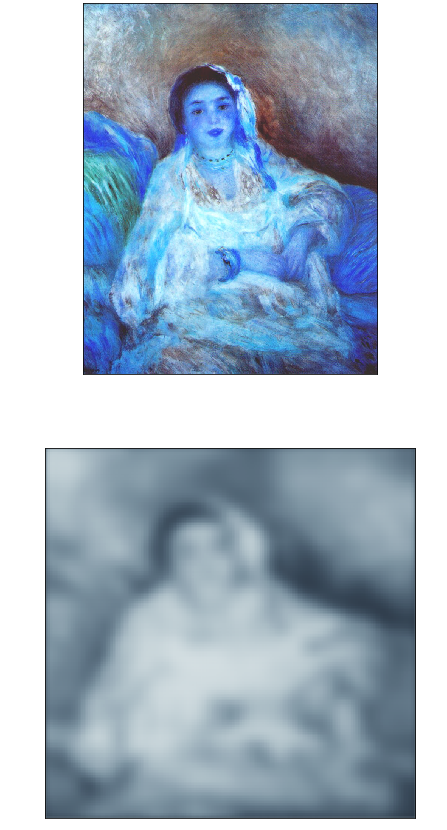
test_img = '/path/to/test/all/pierre-auguste-renoir_algerian-woman-seated-1882.jpg'
data = [test_img]
pred = dd.post_predict(sname,data,parameters_input,parameters_mllib,parameters_output)
p = pred['body']['predictions'][0]
decoded_img = p['vals']
n = 1
plt.figure(figsize=(40,20))
for i in range(n):
ax = plt.subplot(2, n, i + 1)
ref_img = cv2.imread(test_img)
plt.imshow(ref_img)
ax.get_xaxis().set_visible(False)
ax.get_yaxis().set_visible(False)
# display reconstruction
ax = plt.subplot(2, n, i + 1 + n)
decoded_img = np.round(np.multiply(decoded_img,255)).reshape((3,width,height)).astype(np.uint8)
decoded_img = np.swapaxes(decoded_img,0,2)
decoded_img = np.rot90(decoded_img,1)
plt.imshow(decoded_img,origin='lower')
ax.get_xaxis().set_visible(False)
ax.get_yaxis().set_visible(False)
This builds a convolutional autoencoder neural network with an hourglass architecture. The model is trained with the following parameters:
autoenc_cnnis the example job name
training_repospecifies the location of the train datatesting_repospecifies the location of the test dataautoencodersets to true specifies that the model is trained as autoencoder, i.e. its labels are its inputs.activationusesrelunon-linearitiesscaleallows to scale the pixel values from [0,255] down to [0,1], a requirement for the Sigmoid cross-entropy loss that is used to train the autoencoder.noise-probspecifies the amount of noise. This is useful to build denoising autoencoders that seek to remove the noise from images typically. Note that for this reason when using noise the architecture automatically forces the reconstruction on the noise-free image.
Once training has completed, the code on the right can be used to generate the image recontruction below: