Embedded Neural Network Inference with DeepDetect
- Construction site safety and work monitoring
- Cars license plate OCR in parking lots
- Defect detection in manufactured precision pieces
DeepDetect is optimized for running on ARM boards and computers. The instructions below make it possible to run it on a Raspberry Pi 3.
DeepDetect relies on the embedded inference library NCNN that is optimized for a variety of boards, phones and embedded devices. Jolibrain maintains a fork of NCNN with more features, and uses it for DeepDetect.
In this tutorial, we set up DeepDetect for Raspberry Pi with NCNN backend, and we use LiveDetect from the DeepDetect ecosystem to stream live videos from a camera and produce an overlay of bounding boxes for detected objects in real-time.
Setting up the DeepDetect Server for Raspberry Pi
We are going to install Docker on the Raspberry Pi, as it works very well with very little overhead. If you already have Docker installed, you can directly get & run the Raspberry Pi Docker image.
Install Docker:
curl -fsSL get.docker.com -o get-docker.sh && sh get-docker.sh
sudo groupadd docker
sudo usermod -aG docker $USER
Get & Run Raspberry Pi Docker image for DeepDetect
docker pull jolibrain/deepdetect_ncnn_pi3
docker run -d -p 8080:8080 -v $HOME/models:/opt/models jolibrain/deepdetect_ncnn_pi3
Option 1: Running live image detection with LiveDetect
LiveDetect is part of the DeepDetect ecosystem. It allows acquiring video from a live camera and processing it in real-time from a Raspberry Pi. It is written in Go, easy to set up and use.
Set LiveDetect up
Here we downloaded the LiveDetect release for RPI3, and saved it to the Pi.
You can also build LiveDetect from source.
Run a live video stream processed with a Neural Network
./livedetect-rpi3 \
    --port 8080 \
    --host 127.0.0.1 \
    --mllib ncnn \
    --width 300 --height 300 \
    --detection \
    --create --repository /opt/models/voc/ \
    --init "https://deepdetect.com/models/init/embedded/images/detection/squeezenet_ssd_voc_ncnn.tar.gz" \
    --confidence 0.3 \
    --device-id 0 \
    -v INFO \
    -P "0.0.0.0:8888" \
    --service voc \
    --nclasses 21 \
    --create-service
Explanations and additional information on LiveDetect
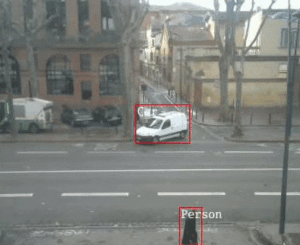
This automatically download the squeezenet_ssd_voc_ncnn model that detects 20 types of objects, including cars and people, sets it up and processes the streamed video frames in real-time.
Reach http://<your_raspberry_ip>:8888 with a Web browser, where <your_raspberry_ip> can be obtained with ifconfig from the raspberry terminal.
If you built LiveDetect from source, the command should start with ./livedetect instead.
This command line has different options:
The
--portrefers to the port used by your DeepDetect instance (usually 8080). The--hostargument points out to the host of your DeepDetect instance (here localhost, that is to say 127.0.0.1).Thanks to the
--mllib ncnnoption, we are choosing to use ncnn instead of caffe for example.For the
squeezenet_ssd_voc_ncnnmodel, the width and height should be 300 each as stated. But these can change depending on the model you are using.The
--detectionoption also depends on the model you are working with.--createmakes it possible to launch the service before starting real-time prediction (which is a requirement).The
--repositorygives the absolute path for the service creation.The
--initoption is the path to the pre-made compressed archive for DeepDetect’s models.--confidenceis the confidence level you pick: only the classifications or detections with probabilities above this threshold will be returned.You can change this threshold (it must be between 0 and 1) and see what happens.
The
--device-idis the id of the camera you plugged in.-v INFOis the verbose option which allows us to get information about the the live processing.-Pmakes it possible to see the processed video. Both--serviceand--nclassesare specific to the model you are using: they refer to the kind of service and to the number of classes of the model used.The
--create-serviceoption should only be used the first time you use the model, once it has been created, you should delete it.
Finally, you can get more information on how to use the LiveDetect command by typing:
./livedetect-rpi3 --help
To use your own model, previously converted, remove the --init option and replace value of --repository by the path to your own model.
Don’t forget to adapt the number of classes with --nclasses, --width and --height if needed.
Option 2: Setting up a pre-trained model and using the REST API
DeepDetect provides embedded pre-trained models for NCNN.
Go to the squeezenet_ssd_voc_ncnn model page and follow usage instructions. This model detects 20 types of objects, including cars, people, …
Option 3 : Convert a model to run on Raspberry Pi efficiently
If you don’t have your own model, proceed as described in the sections below using existing models.
Existing models need to be converted in order to yield best performances on the Pi and ARM boards in general.
Before converting an embedded model trained with the DeepDetect Platform typically, you first need:
A trained Caffe model files, i.e. both
deploy.prototxtandmodel_xxx.caffemodelfiles.caffe2ncnnthat is a small program to convert Caffe weights into NCNN format. Follow instrucions below :git clone https://github.com/jolibrain/ncnn.git cd ncnn mkdir build cd build cmake .. make
Now, setup a new directory for the embedded model, e.g. embed_model.
To convert a model, follow the instructions below:
# go to your NCNN build from the previous step
cd ncnn/build/tools/caffe/
./caffe2ncnn 0 /path/to/deploy.prototxt /path/to/model_xxx.caffemodel /path/to/embed_model/ncnn.params /path/to/embed_model/ncnn.bin
where ncnn.bin and ncnn.params are the converted model files.
- Copy the
corresp.txtfile to theembed_modeldirectory.
That’s it, the model optimized for NCNN and ARM is ready to be used.